Secondo il Weldon, questo punto come sotto descritto è il punto croce originale ed è
stato trovato nei piu’ antichi lavori italiani.
Nella Enciclopedia del ricamo della DMC, Dillmont parla anche di un punto croce italiano a due facce, che e’ separato da punti orizzontali e verticali. Qui viene illustrato solo il primo tipo.
Le immagini qui sotto mostrano il punto lavorato sul canovaccio di plastica, al fine di permettervi di contare agevolmente e di vedere sia il davanti che il dietro dei punti.
Alla fine di questo articolo troverete immagini di questo punto lavorato su un lino
32 count e su una aida 18 count (aida 72).
Il punto croce double side come spiegato qui non puo’ essere utilizzato per punti isolati in disegni con righe discontinue. Ci sono metodi per ottenere questo, ma non sono mostrati qui.

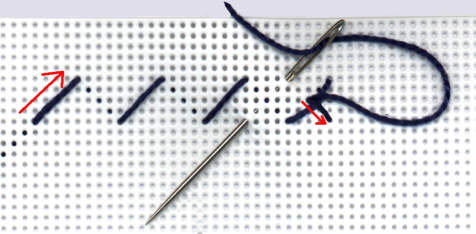
L’immagine precedente mostra il primo passaggio, e l’inizio del secondo.
Si noti quanto segue prima di proseguire:
A. Si richiedono quattro passaggi per ogni riga.
B. Si lascia spazio per una croce in piu’ tra ogni “X” che viene completata nei primi due passaggi.
C. Sono richiesti mezzi punti in ogni passaggio.
1. Da sinistra a destra: spostatevi di quattro fili in alto e a destra (diagonale) per il primo punto. Lasciate 4 fili e ripetete per tutta la riga come mostrato.
2. Uscite nel mezzo, e fate un punto diagonale verso l’angolo in basso a destra passando sopra al mezzo punto gia’ esistente. Uscite di nuovo nel mezzo e procedete con il secondo passaggio in modo analogo al primo, solo andando da destra a sinistra.

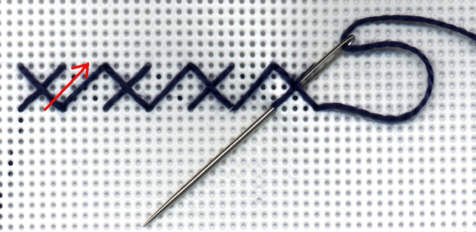
Il terzo passaggio completato e l’inizio del quarto. Notate ancora il mezzo punto
alla fine.
In questo passaggio, farete la prima gamba delle croci in mezzo a quelle gia’
completate. Andate da sinistra a destra come avete gia’ fatto al punto 1. prima.

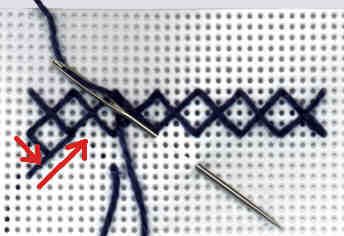
La prima riga e’ stata completata con il quarto passaggio. La mezza croce che inizia l’ultimo passaggio sara’ doppia su entrambi i lati del materiale.
La seconda riga si inizia con un mezzo punto che parte dall’angolo superiore sinistro e va giù nel mezzo. L’ago viene su quindi nell’angolo in basso a sinistra e va giu’ nell’angolo in alto a destra come all’inizio del primo passaggio.


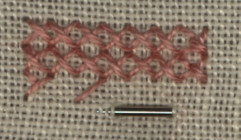
Le immagini precedenti sono due esempi di prova. Quello a sinistra su un lino 32 count utilizzando perle’ n. 8. Due righe sono state completate e una terza iniziata.
L’esempio a destra e’ con due capi di DMC rosso su Aida 18 count (Aida 72). Una riga e’
completa, e la seconda ha i primi due passaggi finiti.
E’ molto piu’ difficile ricamare sull’aida piccola perche’, per i quarti di punto, bisogna dividere i fili, e c’e’ poco spazio per posizonare bene i punti. Ma come si vede e’ possibile ricamare con questa tecnica anche sull’aida, come sul lino.
Testo e immagini per concessione di Heritage Shoppe – 1999
http://www.heritageshoppe.com
Nessuna parte di queste informazioni puo’ essere riprodotta in
alcuna maniera senza esplicita autorizzazione scritta.
Traduzione di Stefania Bressan.
Bibliography: Th. d’Dillmont and Weldon’s Guide to Fancywork (UK)
According to Weldon’s, this stitch as outlined below is the original cross stitch and was found on very early Italian works.
In the DMC Encylopedia of Needlework, Dillmont also refers to two-sided Italian or Arrowhead Cross Stitch, which is separated by horizontal and vertical stitches. Only the former is shown here.
The graphics below show the stitch being worked on plastic canvas. This was done to allow you to easily count and see both the front and the trailing stitches at the back of the work.
At the end of this article you will find graphics of this stitch worked on 32-count Belfast
and 18-count aida.
Reversible Cross Stitch as outlined here cannot be used for isolated stitches in designs with broken lines. There are methods to accomplish this, but are not shown here.

The above graphic shows the first journey, and the beginning of the second.
The following should be noted before proceeding:
A. Four journeys are required for each row.
B. You are leaving room for an additional cross stitch between each “X” that is completed in the first two journeys.
C. Half stitches are required in each journey.
1. Proceeding left to right: go up 4 and over 4 threads for the first stitch. Leave 4 threads and repeat across the row as shown.
2. Come up at the middle and make a diagonal stitch down “over” the long stitch. Come back up at the middle and proceed to make the second journey exactly like the first, only going right to left.

The third journey completed and the beginning of the fourth. Note again the half
stitch at the end.
On this journey, you will be making the first leg of the crosses in between the completed crosses of the row. Go left to right just as you did in No. 1 above.

The first row has been completed with the fourth journey. The half cross which
begins the last journey will be double on both sides of the material.
The second row is started with a half stitch started at the upper left and coming down at the middle. The needle then comes up at lower left and goes down at upper right as in the beginning of the first journey.


The above graphics are two stitched samples. The one at left on 32-count Belfast linen using No. 8 perle cotton. Two rows are completed and a third begun.
The example at right is 2 strands of red DMC on 18-count Aida. One row is complete and the second row has the first two journeys finished.
It is much more difficult to stitch on this small-count aida because for the half stitches,
you must split the threads, and there is little room to carefully smooth out the half stitches. But as you can see – it is possible to stitch this technique on aida as well as linen.
The above text and graphics courtesy Heritage Shoppe – 1999http://www.heritageshoppe.com No portion of this information may be reproduced in any manner whatsoever without express written permission.
